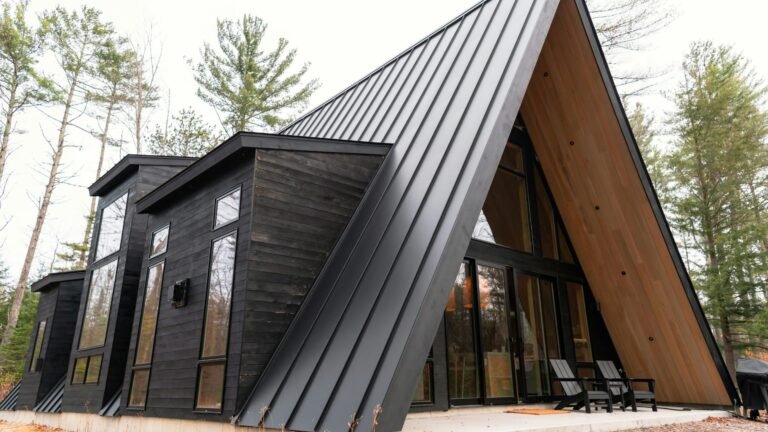
How to Prepare Your Log Cabin for Winter: A Cabin Owner’s Survival Guide
Your log cabin winter preparation plan needs to be solid. Cold temperatures will damage an unprotected cabin through rot, drafts, and pest infestations that can get pricey. I own a cabin and learned that wood stays protected when you maintain 50 degrees. This prevents damage from humidity and temperature changes that make wood expand and contract.
Log rot stays active year-round, so cabin preparation matters. You should keep the heat at 55 degrees or higher if you plan a winter vacation. Our log cabin winter checklist has everything from checking the exterior to getting ready for emergencies. Just one tip from this piece will make your winter retreat better by a lot.
Let’s protect your investment with steps to seal the exterior, get the roof and gutters ready, protect the plumbing, and guard against winter hazards. Note that clean gutters and downspouts directly affect your home’s lifespan. That’s why we’ve added detailed maintenance steps for your cabin’s every feature.
Inspect and Seal the Exterior
Your log cabin’s exterior is its first defense against winter’s harsh elements. A thorough check of your cabin’s outer shell before the first snowfall will prevent damage that could get pricey and help maintain its rustic charm.

Check for cracks or gaps in logs
Logs naturally dry and shrink with time. This process creates checks (vertical cracks) and gaps between courses. These openings affect more than just looks—they let moisture, drafts, and pests into your cozy retreat. You should walk around the entire exterior and look for:
- Upward-facing cracks that collect water and cause decay
- Gaps between log courses with failed chinking or caulking
- The south and west-facing walls show damage first due to sun exposure
Here’s a simple test to check surface integrity: scratch across the wood grain with your fingernail on the sunny sides of your home. Wood fiber that comes off easily shows UV radiation has broken down the lignin (natural glue holding wood fibers together).
Re-caulk or chink where needed
Once you spot problem areas, you’ll need to decide between caulking and chinking. While people often use these terms interchangeably, they serve different purposes:
Caulking works best for smaller gaps (less than 1/2 inch wide). It moves with the natural expansion and contraction of wood. Standard caulk from home centers isn’t enough—you need products made specifically for log homes. Log home sealants stick to wood while expanding and contracting with the logs.
Chinking provides a thicker and more resilient solution, perfect for sealing larger gaps from 1/2 inch to 6 inches or more. It creates an impermeable barrier and adds structural stability by reducing log movement.
A golden rule applies to both: your sealant thickness should be about half the gap’s width but never exceed 3/8 inches. Deep voids need backer rod stuffed about 1/4 to 3/8 inch below the surface before adding sealant.
Inspect and re-stain if necessary
Stain does more than enhance looks—it protects your cabin from moisture, UV damage, and insects. You should reapply stain when:
- It’s been 2-3 years since the last application
- Water soaks into wood instead of beading off when sprayed
- You see discoloration, fading, or peeling
The best temperature range for application falls between 45-90 degrees Fahrenheit—colder temperatures might cause frost to interfere with proper adhesion. Clean logs really well before restaining to remove dirt, peeling old stain, and debris that prevent proper adhesion.
Seal around windows and doors
Windows and doors often let heat escape and moisture enter. Look carefully for:
- Gaps between the window/door frames and logs
- Cracked or separating caulking
- Drafts near these areas
Specialized products like Energy Seal work best for these vital spots. They stretch well with the logs’ natural movement. Large voids need urethane foam first—use open-cell varieties that won’t expand too much and damage frames.
Good sealing around windows and doors improves energy efficiency and blocks drafty air, moisture, and external pollutants like wildfire smoke.
This exterior maintenance isn’t just about looks—it’s a vital investment in your cabin’s longevity and winter comfort.
Prepare the Roof and Gutters
Your roof and gutter system are the foundations of log cabin winter preparation. They create a vital defense against moisture—your log home’s biggest enemy during winter months.
Clean out gutters and downspouts
Leaves and debris can block your cabin’s drainage system, and repairs can get pricey. I clean my gutters twice a year—spring and fall. This helps water flow freely. The task becomes even more important after trees lose their leaves in autumn.
To work effectively:
- Clear visible debris with a trowel or gutter scoop
- Run a garden hose through gutters to find hidden clogs
- Watch your downspouts and make sure they direct water away from the foundation
Here’s a quick test: run water through your cleaned gutters to spot any leaks that need fixing.
Inspect roof for damage or leaks
Snow and ice add substantial weight to your roof in winter. You should look for:
- Missing or damaged shingles
- Areas that sag and might show structural problems
- Water stains or discoloration
- Materials that are cracked, rotting, or warped
Stay safe—use binoculars from the ground instead of climbing up. Many companies now offer drone inspections that spot issues like missing shingles, cracks, or ice dam-prone areas.
Install gutter guards if needed
Gutter guards are a smart investment that cut down on maintenance while protecting your cabin. They don’t completely eliminate cleaning but make the job easier and less frequent.
Take a look at what typically collects in your gutters before choosing guards. Screens stop leaves and twigs easily, but pine needles and seeds might slip through. Pick options that match your needs.
These guards help prevent:
- Roof and gutter damage from standing water
- Foundation issues from moisture runoff
- Mosquito breeding grounds
- Mold and mildew growth
Check flashing around chimneys
Flashing creates a waterproof barrier where your roof meets the chimney. This connection often leaks, so you need a full inspection.
Your chimney has five main types of flashing:
- Step flashing between shingle courses
- Counter-flashing over other flashing edges
- Apron flashing where roof meets headwall
- Cricket flashing around wider chimneys
- Backer flashing on narrow chimneys’ upslope side
Watch for rust spots (orange or reddish-brown), cracked caulk, or flashing pulling away from the chimney. Wide chimneys—over 30 inches—need a cricket (water diverter) to stop water and snow buildup that causes leaks.
It’s worth mentioning that fixing these areas now saves you from major problems when winter hits full force.

Protect Plumbing and Heating Systems
Plumbing and heating systems face their biggest challenges during winter’s coldest days. Your log cabin’s vital systems need protection not just for comfort, but to prevent devastating damage.
Drain outdoor hoses and shut off valves
Start by disconnecting all garden hoses before the first freeze hits. You should really drain any leftover water and store them inside to avoid freeze damage. Make sure you know where your water main is for quick shutoff during emergencies.
You’ll find shutoff valves for outdoor water supplies inside most houses. After you turn these valves off, open the outdoor faucets to drain trapped water from the pipes. This quick step stops water from freezing and expanding in your pipes, which often causes bursts.
Regular exterior faucets can be upgraded to freeze-resistant models that are nowhere near as likely to freeze and burst. This gives you one less worry during harsh winter weather.
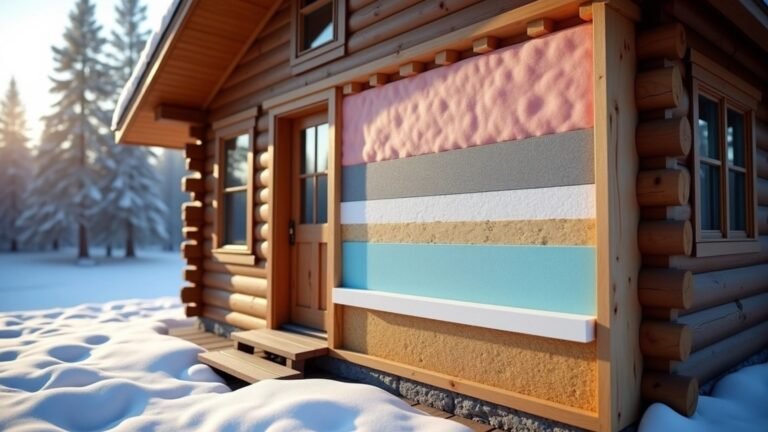
Insulate exposed pipes
These pipes freeze most easily:
- Outdoor plumbing and sprinkler lines
- Indoor water supply pipes in unheated areas (basements, garages)
- Pipes running against walls with minimal insulation
Your pipes need winter protection just like you need a warm coat. Put foam pipe insulation on all exposed outdoor water pipes and those in unheated areas. Areas with very cold weather might need electric heat tape, which keeps pipes warm during cold snaps.
On top of that, it helps to keep your cabin’s temperature at least 50-55°F even when you’re not there. This small energy cost could save you from dealing with expensive burst pipes.
Service the furnace or heating system
Book an HVAC professional before winter starts to clean ducts and make sure your system runs well. Your technician should inspect burners, test for carbon monoxide leaks, and check that everything meets manufacturer specs.
A working heating system does more than keep you cozy—it protects your entire cabin. An electric space heater with multiple settings makes a good backup plan. Just run it at its lowest setting to keep temperatures above freezing while saving energy.
Install a programmable thermostat
A programmable thermostat is one of the most economical solutions for winter, and you might save up to 10% yearly on heating and cooling costs. These devices let you set your cabin’s temperature based on your schedule.
You can pick from several types:
- 7-day models (different schedule each day)
- 5-2-day models (weekday/weekend schedules)
- 5-1-1-day models (weekday/Saturday/Sunday schedules)
- Smart thermostats with WiFi connectivity
Smart thermostats are great for cabin owners. You can warm up your cabin from your phone before you arrive, so it’s cozy when you get there. This technology helps you save energy and gives you peace of mind since you can check and adjust your cabin’s temperature from anywhere.
Secure the Interior and Prevent Hazards
Safety measures inside your log cabin deserve the same attention as outside preparations for winter. Your cabin and family could be at risk during the cold months if you skip these significant safety checks.
Test smoke and carbon monoxide detectors
Your safety devices need regular checks to work right when it matters most. You should test both smoke and carbon monoxide detectors monthly by pressing and holding the “Test Alarm” button on the front panel. A detector needs replacement if you don’t hear an alarm sound.
I make it a point to replace batteries in these vital devices twice a year. Smoke detectors need cleaning based on manufacturer instructions—you can use compressed air or a vacuum to stop false alarms. Testing the sensitivity will give a clear picture of whether detectors activate with specific amounts of smoke in the chamber.
Replace old fire extinguishers
Fire extinguishers play a vital role in safety, but many cabin owners forget about them. Powder extinguishers don’t work well in living spaces because they can cause damage.
Better options include:
- 1L water mist extinguishers
- 2L P50 foam extinguishers
- 3L ABF rated wet chemical extinguishers
Your cabin needs extinguishers in strategic spots, especially when you have areas where fires might start, like the kitchen or near the fireplace.
Inspect fireplace and chimney
We scheduled professional chimney inspections yearly whatever the usage frequency. Professional chimney sweeps get rid of creosote deposits that might cause dangerous chimney fires. They also check the flue liner’s condition to protect your home if a chimney fire starts.
Beyond professional help, you should check that gas lines into fireplaces have proper seals and refractory panels stay intact. Clean your fireplace before and after each use—FEMA puts it simply: “clean chimneys don’t catch fire”.
Store firewood safely away from the cabin
Smart firewood storage stops moisture buildup and keeps pests away. Set up wood off the ground with a base and shield it with a sloped roof overhang big enough to block rain and snow. Wood needs proper seasoning before burning—softwoods need 6 months while hardwoods take 12 months.
Your woodpile stays stable if you use rope or wire to connect T-posts or 2×4 ends on the storage structure. This simple step keeps your wood available all winter while reducing fire risks near your cabin.
Winterize Landscaping and Emergency Prep
Your cabin’s surroundings need attention before winter arrives. A mix of outdoor prep work and emergency planning will give a confident start to face the winter months.
Trim trees and shrubs near the cabin
Most woody landscape plants need pruning in February and March. Trees and shrubs stay dormant during these months, and the frozen ground helps you reach branches easily. Good pruning shapes plants better, gets rid of dead branches, and stops crossing branches from getting wounded. The tree canopies also open up, which lets in more air and light while cutting down moisture that leads to disease.
You should work on deciduous trees like maple, oak, elm, and ash, plus deciduous shrubs such as barberry, burning bush, and dogwood. Notwithstanding that, keep your pruning tools away from spring-flowering shrubs like lilacs and magnolias in winter – you’ll cut off their flower buds.
Seal decks and patios
Outdoor wood surfaces take a beating from freeze-thaw cycles. Water sneaks into tiny cracks and expands about nine percent when frozen. The constant freezing and melting between November and March leads to warped, cupped, and splintered wood.
Your deck needs these steps:
- Clear away furniture, planters, and debris
- Clean it well with deck cleaner or mild soap solution
- Look for soft spots that show rot
- Put on quality penetrating sealer or semi-transparent stain
Late September through mid-October works best for this job. Just make sure temperatures stay above 50°F for at least 48 hours so everything cures properly.
Prepare an emergency kit with essentials
Your emergency kit should have:
- Water (one gallon per person daily for several days)
- Non-perishable food supply
- Battery-powered or hand-crank radio
- Flashlight and extra batteries
- First aid supplies
- Cell phone with chargers and backup battery
Keep important documents in waterproof containers and put your kit somewhere easy to reach. Check the items regularly and replace anything that’s expired.
Store snow removal tools and ice melt
The right snow removal equipment makes winter upkeep a lot easier. Get professional-grade tools like shovels, pushers, and ice scrapers. Stock up on granular ice melters to break existing ice and liquid melters to stop new ice from forming.
Storage boxes will protect your supplies from moisture and keep them ready for use. Remember to put up driveway markers – they’ll prevent damage during plowing.
Conclusion
Winter preparation is a vital investment for every cabin owner. This piece outlines detailed steps to protect your cherished retreat from harsh winter conditions. A good exterior seal around logs, windows, and doors creates the first defense against moisture intrusion. It also helps to maintain your roof and gutters to prevent water damage that could compromise your cabin’s structural integrity.
Your plumbing system faces substantial risks during freezing temperatures. You need to drain outdoor lines, insulate exposed pipes, and maintain adequate heating as critical protective measures. The interior safety needs equal attention – from testing smoke detectors to storing firewood properly.
Getting your landscape ready and having emergency supplies will help you face winter’s challenges confidently. The checklist might look substantial, but each task substantially contributes to your cabin’s longevity and your family’s safety.
Experience shows that proactive maintenance saves money and prevents headaches later. Small problems can quickly become major issues during harsh winter conditions. The joy of relaxing in a warm, secure cabin during a snowstorm makes these preparations worth the effort.
These steps will help reshape the scene and turn your log cabin from a potential winter liability into a cozy sanctuary. You won’t have to worry about burst pipes or roof leaks. Instead, you can focus on creating wonderful winter memories in your well-prepared retreat. You’ll thank yourself when you’re comfortably sipping hot chocolate beside the fireplace while winter rages outside your properly winterized cabin.
FAQs
Q1. How can I effectively winterize my log cabin? To winterize your log cabin, start by sealing the exterior, including cracks in logs and around windows and doors. Clean gutters, inspect the roof, and protect plumbing by insulating pipes and draining outdoor lines. Inside, test safety devices, prepare the fireplace, and create an emergency kit. Don’t forget to maintain a minimum temperature to prevent freezing.
Q2. What’s the best way to prevent log rot in a cabin during winter? To prevent log rot, ensure proper sealing and staining of the exterior logs. Regularly inspect for cracks or gaps and re-caulk or chink as needed. Maintain good ventilation and keep the cabin’s interior at a consistent temperature, ideally around 50-55°F, even when unoccupied. This helps control moisture and prevents the expansion and contraction that can lead to rot.
Q3. Is insulating a log cabin necessary, and what are the benefits? Insulating a log cabin is beneficial, especially for year-round use. It can significantly reduce heating costs, prevent condensation that leads to mold and wood rot, and improve overall comfort by keeping the cabin warm in winter and cool in summer. While logs provide some natural insulation, additional insulation can enhance energy efficiency.
Q4. How do I prepare my log cabin’s plumbing for winter? To prepare your cabin’s plumbing for winter, start by draining outdoor hoses and shutting off exterior water valves. Insulate exposed pipes, especially in unheated areas. Consider using heat tape for extra protection in extremely cold regions. Maintain a minimum indoor temperature of 50-55°F, even when the cabin is unoccupied, to prevent pipes from freezing.
Q5. What emergency supplies should I keep in my log cabin for winter? Keep an emergency kit in your log cabin that includes: a gallon of water per person per day for several days, non-perishable food, a battery-powered or hand-crank radio, flashlights with extra batteries, first aid supplies, and a cell phone with chargers and a backup battery. Also, store important documents in waterproof containers and keep snow removal tools and ice melt readily available.