Fall Pest-Proofing Your Log Cabin: Keep Mice, Stink Bugs, and Cluster Flies Out This Winter
If you’ve noticed stink bugs sunning themselves on your cabin’s south wall or a few slow, clumsy flies bumping against the windows, the annual fall invasion has started. From late September through October, a handful of insects and rodents go looking for a warm, dry place to ride out the winter. A log cabin, with its hundreds of feet of log joints, corner notches, and settling gaps, offers them more doorways than almost any other kind of house.
The good news: almost all of it is preventable with a weekend of sealing work, and mid-October is the right time to do it. Here’s what’s trying to get in, where it gets in on a log home, and how to stop it.
Key Takeaways
- Timing matters. Most overwintering pests move indoors in September and October. Seal now, before the first sustained cold snap.
- Gaps are tiny. Some insects squeeze through openings around 1/8 inch wide; mice need only about 1/4 inch.
- Log homes have unique entry points. Checked logs, shrunken chinking, corner notches, and settling gaps above doors and windows are the usual culprits.
- Exclusion beats spraying. Sealing and screening do more long-term good than broadcast pesticide applications.
- Some pests are nuisances; others damage wood. Know which is which so you spend effort where it counts.
Why Log Cabins Are Pest Magnets in Fall
Every home gets fall invaders, but log construction adds a few complications a stick-framed house doesn’t have.
- Logs keep moving. Walls settle and logs shrink and swell with the seasons. Joints that were tight at construction open up over time, and chinking or caulk can pull away from the wood.
- Checking creates channels. Cracks (checks) that open along the length of a log can run deep enough to give insects a sheltered path into a wall.
- Round profiles leave voids. Where round logs meet a flat trim board, window buck, or roofline, you often get a crescent-shaped gap that’s easy to miss and hard to fill with a simple bead of caulk.
- Cabins are often empty. A weekend or seasonal cabin can sit closed up for weeks at a time. By the time anyone notices mouse droppings or a window full of flies, the pests are well established.
Meet the Fall Invaders
Not every pest that moves in this time of year is a threat to your logs. The table below separates the nuisances from the ones that do real damage.
| Pest | What You’ll Notice | Damages Logs? | Main Concern |
|---|---|---|---|
| Brown marmorated stink bug | Shield-shaped bugs on sunny walls, then indoors a few at a time | No | Odor when disturbed or crushed |
| Asian lady beetle | Orange “ladybugs” swarming south and west walls | No | Odor, yellow staining, occasional pinching bites |
| Cluster flies | Large, sluggish flies at windows on warm winter and spring days | No | Sheer numbers; dead flies attract other scavengers |
| Boxelder bugs | Black-and-red bugs clustered on siding near boxelder or maple trees | No | Staining and nuisance |
| Mice | Droppings, chewed insulation, gnawed log ends or trim | Yes, by gnawing | Contamination, nesting in walls, chewed wiring |
| Carpenter ants | Sawdust-like frass, winged ants indoors | Yes | Excavated galleries in damp or softened logs |
The insect invaders share a pattern: they collect on the warmest, sunniest sides of a building (usually south and west), crawl upward, and slip into any crack they find. That makes those walls your top priority.
A Quick Note on Cluster Flies
Cluster flies are a special case. Their larvae develop as parasites of earthworms in the soil, so a cabin surrounded by lawn or meadow often sees lots of them. They tend to hide in attics and wall voids all winter, then appear at the windows on warm days, which is why many owners don’t realize they have them until late winter or spring. You can’t solve them by getting rid of earthworms; exclusion around the upper walls, soffits, and attic vents is the answer.
The Log Cabin Entry Points to Check
Walk the outside of the cabin on a sunny afternoon, starting with the south and west walls. Look for active insects and for daylight. Then do the same inside after dark with a flashlight pointed at the walls from outside (or vice versa) to spot light leaks.
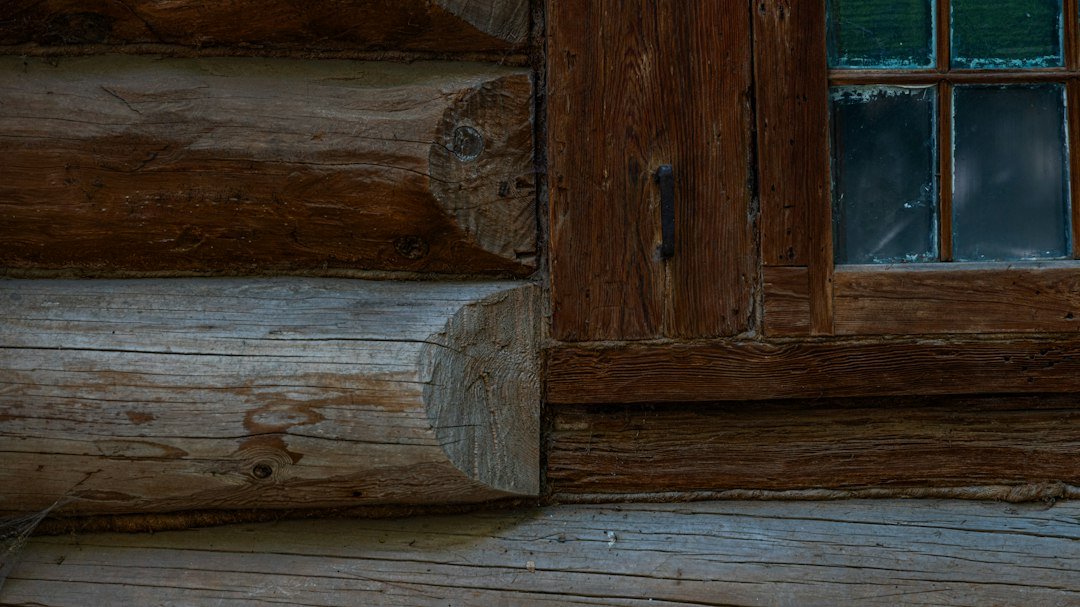
- Chinking and log joints. Look for chinking that has cracked, pulled away from one log, or fallen out. Any separation you can slip a business card into is big enough for insects.
- Corner notches. Saddle and dovetail corners have end grain and small voids that open as logs shrink.
- Settling gaps above doors and windows. The space left for settling is supposed to be packed with compressible insulation and covered by trim. Over time, the insulation compresses or falls out and the trim no longer seals.
- Window and door perimeters. Check caulk where the frame meets the log, plus door sweeps and thresholds.
- Utility penetrations. Dryer vents, hose bibs, electrical service entries, propane lines, and plumbing chases are classic mouse highways.
- Roof-to-wall transitions. Gaps where the top round of logs meets rafters, soffits, or gable trim are prime cluster-fly and lady-beetle entry points.
- The bottom round and foundation. Check where the sill log sits on the foundation, plus crawlspace vents and access doors.
- Large checks on the weather side. Upward-facing checks that collect water also give insects a way in. These should be sealed for moisture reasons anyway.
How to Seal It: Matching the Fix to the Gap
| Problem Area | Best Fix | Why |
|---|---|---|
| Cracked or separated chinking | Remove loose material, add backer rod, apply log-home chinking | Elastic chinking flexes with log movement instead of cracking again |
| Thin joints and small gaps between logs | Log-home caulk (not standard silicone) | Formulated to stretch and bond to wood and stain |
| Round-log voids at trim and bucks | Pre-cut foam log gap inserts, then caulk over | Fills irregular crescent-shaped gaps that caulk alone can’t bridge |
| Upward-facing checks | Check sealant or log caulk | Stops both water and insect entry |
| Utility holes and mouse-size gaps | Copper mesh or steel wool packed tight, then sealant | Mice chew through foam and caulk alone |
| Doors | New door sweeps and threshold seals | The single most common entry point for mice |
| Attic, gable, and crawlspace vents | Fine metal screening, sealed at the vent housing | Keeps ventilation working while blocking insects |
One important detail: a screened vent does no good if there’s an open gap between the vent housing and the logs. Seal around the housing, too.
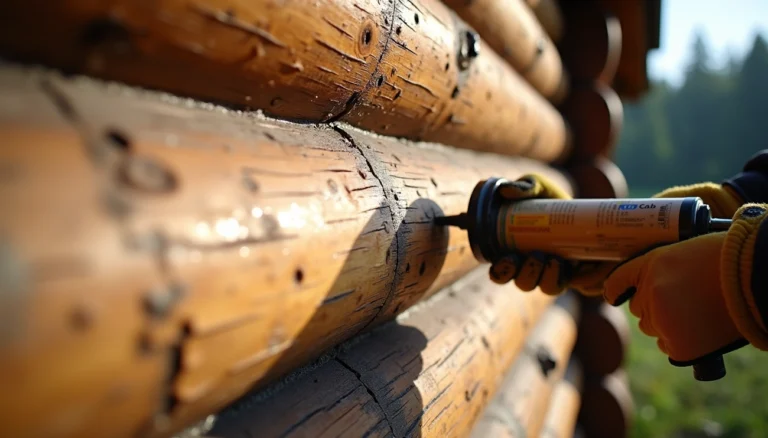
Sealing for pests is the same work as sealing for weather, so it pays to do both at once. If your exterior finish is also due, our guide on how to seal your log cabin covers stains, sealants, and chinking products in more detail.
Outside the Walls: Make the Cabin Less Inviting
- Move the firewood. Stack firewood well away from the cabin and off the ground. A woodpile against the logs is a ready-made mouse hotel and carpenter-ant nursery. Bring in only what you’ll burn in a day or two.
- Trim vegetation. Cut back shrubs and branches so nothing touches the logs or roof. Plantings hold moisture against the bottom courses and give pests a bridge.
- Clean the gutters. Clogged gutters keep the lower logs damp, and damp wood is what carpenter ants (and rot) look for.
- Store food and birdseed sealed. Especially in an unoccupied cabin. A bag of birdseed in the mudroom will draw every mouse within range.
- Change exterior lighting. Warm-colored or yellow “bug” bulbs near entries attract fewer insects to the doors in the evening.
Wood-Damaging Pests: Don’t Wait for Spring
Stink bugs and lady beetles are annoying but harmless to the structure. The pests that actually damage logs deserve a separate look while you’re out there.
- Carpenter ants excavate damp or softened wood. Small piles of coarse sawdust near logs or window sills are the giveaway. Fix the moisture source, and call a professional if you find an active colony.
- Carpenter bees leave perfectly round holes, usually in exposed log ends, fascia, and the underside of overhangs. Fall is a good time to plug old holes so they can’t be reused next spring. Note that borate wood treatments, which work well against many wood-boring insects, are not considered an effective control for carpenter bees.
- Wood-boring beetles leave small exit holes and fine powder. If you suspect them, have the logs evaluated before refinishing.
- Woodpeckers often follow insects. Fresh woodpecker damage can be a sign there’s something living in the logs.
If They’re Already Inside
- Vacuum, don’t squash. Crushing stink bugs and lady beetles releases odor and can stain log walls and chinking. A shop vac with a disposable bag works well; empty it outside.
- Use light traps for cluster flies. Simple sticky light traps in attics or upper rooms catch the flies that emerge on warm days.
- Trap mice promptly. Snap traps along walls are effective. Avoid leaving poison baits in a cabin that sits empty, where rodents can die inside walls.
- Skip the “bug bomb.” Foggers don’t reach insects hidden in wall voids and leave residue on interior wood finishes.
- Seal from the inside, too. Caulk gaps around interior trim, outlets on exterior walls, and ceiling fixtures so insects in the walls can’t reach living space.
A Weekend Fall Pest-Proofing Checklist
- Walk the south and west walls on a sunny afternoon and mark active gaps with painter’s tape.
- Inspect chinking, corner notches, and settling gaps; repair as needed.
- Re-caulk window and door perimeters with log-home caulk.
- Install new door sweeps and check thresholds.
- Pack copper mesh into utility penetrations, then seal.
- Screen attic, gable, and crawlspace vents and seal around the housings.
- Seal upward-facing checks on the weather side.
- Move firewood away from the walls and trim back vegetation.
- Clean gutters and confirm downspouts drain away from the foundation.
- Store food, pet food, and birdseed in sealed containers before closing up.
If you’re shutting the cabin down for the season, pair this list with our full guide to preparing your log cabin for winter, which covers plumbing, heating, and closing-up steps.
What It Costs
For most owners, fall pest-proofing is a DIY materials bill in the low hundreds of dollars: tubes of log caulk, a pail of chinking, backer rod, door sweeps, copper mesh, and vent screening. Hiring a log-home restoration contractor to re-chink or re-caulk a full cabin costs considerably more and is usually priced by linear foot of joint. Either way, it’s far cheaper than repairing chewed wiring, contaminated insulation, or ant-damaged logs.
If you’re still in the planning stage, budget for ongoing maintenance like this from the start. Our free Cabin Calculator can help you estimate the full cost of building and owning a log cabin.
The Bottom Line
Fall pests follow the same rules every year: they show up on the sunny walls in September and October, they crawl upward, and they take any gap they find. Log cabins give them more gaps than most houses, but a careful weekend of sealing, screening, and yard cleanup closes most of them. Do it now, and you’ll spend the winter enjoying the fire instead of vacuuming flies off the windows.
Join the Conversation
What’s the worst pest you’ve battled in a log cabin: mice, cluster flies, carpenter bees, or something else? Share what worked (and what didn’t) in the comments below.